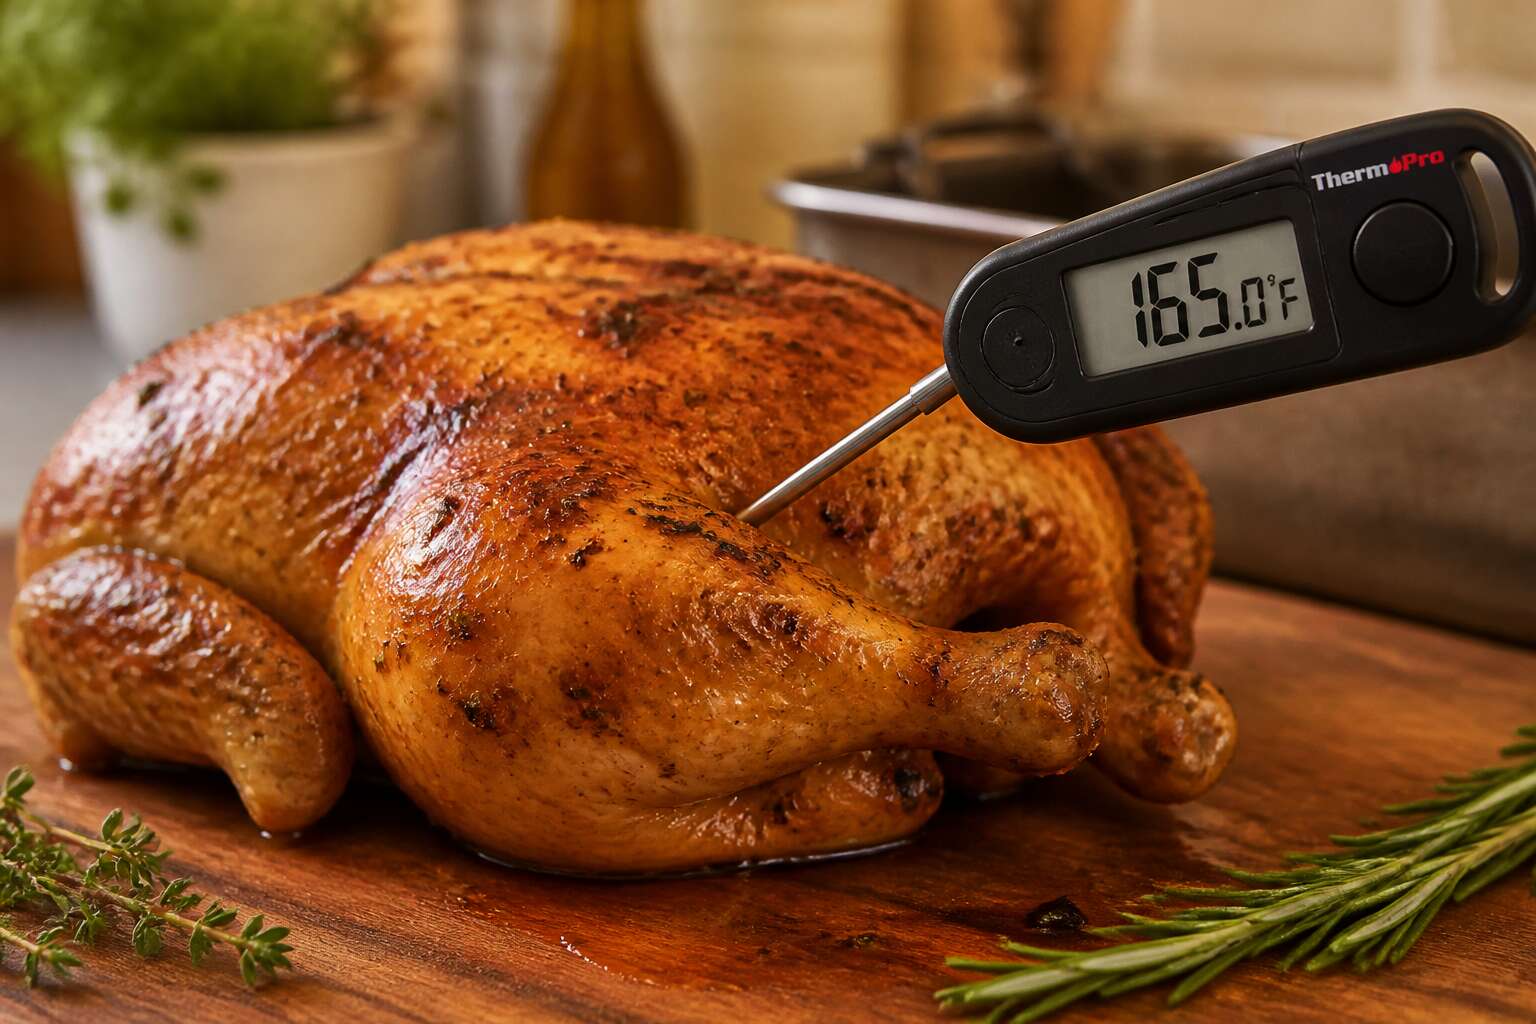
Why Accurate Temperature Reading Is Critical
Food Safety and Salmonella Risks
Salmonella causes roughly 1.35 million infections globally each year, and undercooked chicken is a common source. In South Africa, summer braais often leave meat resting in the danger zone between 4°C and 60°C, where bacteria multiply rapidly. A poultry thermometer removes all guesswork. It reveals the internal temperature instantly, signalling when the meat is safe.
Visual cues like clear juices mislead. Only a probe inserted into the thickest part of the thigh gives certainty. The reading must reach 74°C throughout to kill Salmonella and Campylobacter.
- Test the thickest part of the thigh
- Wait 15 seconds for a stable reading
- Sanitise the probe between uses
I have seen braai masters serve pink chicken, trusting instinct over evidence! The poultry thermometer turns cooking into a precise practice. One accurate reading protects your family from a pathogen that can trigger severe dehydration.
Achieving Juicy, Tender Results
Juicy chicken occupies a narrow band of temperature. Pull the bird too soon and the texture turns rubbery. Leave it too long and the muscle fibres contract, squeezing out moisture, leaving a dry crumb. The poultry thermometer measures this transition precisely.
The probe reads the interior, not the surface. I have pressed thighs with my thumb and still missed the mark. Consider what happens as heat moves through the meat:
- Proteins unwind and relax.
- Collagen softens into gelatin.
- Fibres hold the juices within.
The poultry thermometer tells you when the meat reaches this third stage. A chicken resting at 70°C continues to cook, climbing a few degrees as it sits. The reading shows the moment to pull it from the heat. That single number preserves the tenderness.
Avoiding Overcooked Holiday Birds
Every December, a million South African roasts are carved dry, victims of guesswork. A poultry thermometer removes the gamble. The holiday bird looks golden on the outside while the interior still lags. I have learned this through repeated failure. The thigh meat seemed done, yet the breast stayed pale! Accurate readings matter because the margin between succulent and straw is a single degree. Consider what fails:
- The pop-up timer, which often triggers late.
- Finger pressure, which misleads on thick birds.
- Resting time, which alters the final temperature.
Only a probe read at the thickest part gives truth. Pulling at 71°C instead of 75°C changes everything. The device protects the centrepiece of your holiday table.
Exploring Different Types of Meat Thermometers
Instant-Read Digital Thermometers
In every South African kitchen, roughly seven out of ten cooks test a roast by slicing into the thigh, releasing essential moisture. An instant-read digital thermometer eliminates that guesswork. These devices measure temperature in seconds, allowing you to check multiple spots on a bird without losing heat. When selecting a poultry thermometer, consider probe length and response time. A thin probe leaves minimal marks, while a thicker one may be sturdier. Here are common features to compare:
- Response time under 3 seconds
- Waterproof rating for easy cleaning
- Backlit display for dark ovens
Some models fold into a pocket size, others stay permanently in the oven. The instant-read poultry thermometer excels during carving or resting. I prefer a model with a rotating dial, though digital screens win on accuracy. Wait until the bird rests, then probe the thickest part of the thigh. That single reading tells you exactly when to slice!
Leave-In Probe Thermometers with Alarms
Leave-in probe thermometers have a darker patience than their instant-read cousins. The probe stays buried in the flesh while the bird roasts, sending temperature readings through a heat-resistant cable to a base unit on the counter. No oven door opens, no heat escapes, and the alarm holds its silence until the meat crosses your target. It is a quiet vigil.
For a whole chicken or a large bird, the leave-in poultry thermometer is the wiser choice when time runs long. I have found the alarm summons you from the braai, from the lounge, from wherever the evening takes you. Some models support two probes, tracking breast and thigh simultaneously, cuts that finish at different temperatures. This poultry thermometer asks for patience, then rewards it. Weigh these details:
- Probe cable length, since ovens vary in size
- Alarm volume, because a soft chime gets lost in a busy kitchen
- Temperature range
Analog Dial Thermometers
Somewhere between the instant-read and the leave-in probe sits the analog dial thermometer. It asks nothing of you, no batteries, no screens. Just a needle and a numbered face. I have seen these hung from oven grates and plunged into the deepest part of the thigh. The poultry thermometer waits, unbothered, while the mercury climbs.
The catch is patience. Analog dials move slowly, and they lie if left in the heat. The bird must leave the oven. The probe slips two inches into the meat. Thirty seconds pass. Then the needle settles.
A dial that drifts out of calibration puts dinner at risk. An ice water bath sets it straight, and a straight needle is the only guard between you and a dry roast. No alarm, no beeping. Just you and the dial!
Wireless Smart Thermometers
Your phone can double as a roasting assistant, a boon for any poultry thermometer owner. A wireless smart thermometer pairs a heat probe with an app to monitor the bird’s temperature from across the room. The probe stays in the meat while the oven door remains closed.
This hardware usually consists of a transmitter, a probe, and a receiver. The probe slides into the breast or thigh, sending readings to your handset. Many models include dual probes for white and dark meat.
Wireless models offer considerable range and alerts. Effective signals travel up to 150 metres. Custom alarms sound on your phone when the meat hits your target. Some devices display a temperature graph.
Consider these features:
- Real-time temperature graphs over Wi-Fi
- Voice alerts through a smart speaker
- Rechargeable batteries and magnetic mounts
For a busy cook, a wireless smart thermometer turns a poultry thermometer into a hands-off experience.
Essential Features for Choosing a Reliable Thermometer
Measurement Accuracy and Response Time
Temperature measurement is a promise between the cook and the food. A poultry thermometer that drifts by five degrees can alter the story of a meal, turning a perfect roast into a quiet disappointment. Accuracy depends on the sensor’s calibration and the instrument’s thermal stability, not on the display’s sophistication.
Response time matters just as deeply, and I have learned this through ruined dinners. A slow-reading poultry thermometer forces the cook to hold the bird open, losing heat and moisture with every second. The best probes settle in under three seconds, giving a true reading while the meat rests. Look for these markers:
- A stated accuracy of plus or minus one degree
- A thin probe tip for precise placement
- A rapid stabilisation time
These numbers define reliability, separating tools from toys. Without them, the device is merely decorative, elegant but useless at the exact moment a cook needs certainty.
Temperature Range for Various Poultry Cuts
A reliable poultry thermometer must tolerate the harsh environment of a hot oven and the cold shock of a wash. Look for a sealed body and a probe that resists corrosion. The temperature range is equally critical for various poultry cuts. A whole bird needs a thigh reading of 82°C while the breast is best at 74°C. A duck’s leg demands even longer, pushing past 85°C to break down tough tissue. Different cuts, different targets. Consider these essential features:
- Calibrated sensor for consistent readings
- Waterproof construction for easy cleaning
- A wide range from -20°C to 300°C
Each feature ensures the poultry thermometer performs when the oven door opens. Thin probes slide into the joint without tearing the skin. A clear display, readable from across the kitchen, finishes the tool.
Probe Design and Durability
A poultry thermometer is only as reliable as its probe. The metal tip must slide through skin and muscle without tearing. A thin, sharp probe reaches bone quickly, while a thick one forces the joint apart. Stainless steel is standard, but check for a sealed body. Moisture ruins a weak seal. Consider these design markers:
- Probe length of at least 10 cm
- Welded or seamless body to prevent steam ingress
- Flexible cable for leave-in models
Durability goes beyond the steel. The handle must resist heat, and the display needs to survive a drop. I have seen thermometers fail after one season because the probe tip corroded. Look for rated IP waterproofing, and clean the probe gently after each use. A dependable probe will endure years of roasts.
Waterproof and Easy-to-Clean Models
Moisture kills more thermometer probes than heat ever will. Water works into tiny seams and corrodes the sensor from within. A reliable unit must be fully waterproof. Look for an IP67 rating. That means complete immersion protection for short periods. Cleaning ease matters just as much. A thermometer with hidden crevices traps grease and bacteria. You need a smooth, sealed surface that wipes clean in seconds.
Consider these essential features:
- Sealed probe body without seams
- Removable cable for thorough washing
- No buttons or dials that trap juice
I have thrown away expensive probes because the display fogged up. A genuinely waterproof poultry thermometer should survive a sink rinse without complaint. Sealed construction and easy-clean surfaces define the category.
Display Readability and Backlighting
A poultry thermometer with a dim or angled screen forces you to squint over a hot pan. Backlighting changes that. The best models light up at a press and hold their brightness for several seconds, letting you read the temperature without moving the bird.
Screen contrast matters as much as illumination. Wide viewing angles help when the thermometer sits at the back of the counter. Some models use large digits that stay legible from arm’s length, which matters when your hands are covered in oil.
Look for these display traits when comparing units:
– Adjustable backlight levels
– High contrast numerals
– Wide viewing angle
– Auto rotate for left handed users
Many reliable poultry thermometer designs include at least a few of these features. A bright kitchen under midday sun and a dim braai at dusk require different settings.
Step-by-Step Guide to Taking Poultry Temperature
Correct Placement in Chicken Breasts and Thighs
A single probe placement can skew a reading by 10°C, which is the difference between a safe bird and a gamble. A poultry thermometer is only as good as where you put it. I always tell home cooks to treat the breast and thigh as separate cooking zones. They cook at different rates and need different handling.
For the breast, insert the probe at the thickest point, angling slightly toward the centre. Avoid the bone. For the thigh, find the thickest mass just above the joint and push the probe straight in.
Follow this order:
- Measure the breast first, since it dries out quicker.
- Move to the thigh and read near the socket.
- Rinse the probe between spots with hot water.
The numbers only count when both zones reach their safe thresholds. A poultry thermometer with a slim probe does less damage to the fibres and gives you a truer reading every time.
How to Test a Whole Turkey Without Touching Bone
Testing a whole turkey is not the same as checking chicken cuts. The bird’s size means a single reading is never enough, and the bone structure can distort your numbers. Bone conducts heat faster than muscle, so a probe that touches the breastbone will report a higher temperature than the meat around it.
Insert the poultry thermometer through the thickest part of the breast, angling the tip sideways to avoid the keel bone. For the thigh, probe from the outside toward the joint, but stop before the tip hits the socket.
1. Measure the breast in two separate places.
2. Test both thighs, never one side only.
3. Recheck the deepest spot five minutes after the bird leaves the oven.
A poultry thermometer with a thin probe gives a clearer picture of the true internal temperature without scraping against bone.
Using a Thermometer for Grilled or Smoked Poultry
Grilling or smoking poultry means the heat comes from one side, not all around. The skin will brown long before the meat reaches a safe temperature. A poultry thermometer is the only tool that tells you what is happening inside the meat, but you have to use it in the right order.
- Insert the probe into the thickest part of the breast, parallel to the bird, away from the bone.
- Check the thigh next, especially for smokers, because dark meat tends to lag behind.
- Recheck the deepest spot after you pull the bird off the heat; carryover cooking keeps raising the temperature.
Wait for the display to settle. Then move the probe to a second area, because a single reading on a grilled or smoked piece can hit a fat pocket and mislead you. Take the grill lid off, insert carefully, and read again.
Common Pitfalls and How to Avoid Them
Don’t Judge Doneness by Color Alone
Myoglobin, the pigment responsible for raw poultry’s pinkish cast, denatures unevenly across a single bird. A young chicken’s thigh may remain stubbornly pink at a safe internal temperature, while a frozen bird can appear suspiciously brown long before reaching 74°C. Without a poultry thermometer, visual cues are a gamble with bacterial survival.
Consider these variables that sabotage the colour test:
- Freezing and thawing can alter pigments, producing a cooked appearance prematurely.
- Smoking or grilling creates a pink ring just beneath the skin, mimicking undercooked meat.
- Bone marrow near the joint can leach a dark hue, confusing even experienced cooks.
In my own kitchen, I have watched a perfectly safe roast emerge from the oven with a faint blush near the cavity. The only dependable witness to doneness is a poultry thermometer, and its probe will not lie. Use that reading as your verdict, not the colour on the plate!
The Importance of Regular Calibration
One overlooked failure point in the kitchen is the instrument itself. A poultry thermometer that has taken a knock from the counter edge, or spent a season in a tool drawer, can drift by several degrees. That drift matters. A reading of 71°C when the bird is actually 74°C means you are pulling the roast early, while a false high reading leaves a turkey pink near the bone.
Common causes of drift include:
– Hard drops onto tile or steel
– Repeated exposure to oven heat
– A failing battery
– Moisture seeping into the sensor housing
Regular calibration is the only guard against this silent decay. Packed ice and water hold a stable 0°C; a rolling boil sits at 100°C at sea level, though altitude shifts that number. Check your poultry thermometer against these reference points once a month. If it strays, adjust it or replace it. No amount of placement skill compensates for a sensor that lies.
When to Insert the Probe for Accurate Readings
One common mistake is timing the reading too soon after the bird leaves the oven. Residual heat from the pan can fool the sensor. Let the roast rest for ten minutes, then measure!
Another pitfall is inserting the probe at a careless angle. A skewed entry pulls the tip into fat or connective tissue, giving a false low number. Aim for the thickest part of the thigh, away from the bone.
- Probe away from any visible bone
- Check three separate spots
- Clean the stem between punctures
Cleaning matters because raw juices alter conductivity. Move your poultry thermometer and measure again. If the temperature drops, the tip touched bone or a cold pocket.
Resting Time and Carryover Cooking
One common pitfall is ignoring carryover cooking. The internal temperature of a roast keeps climbing for several minutes after you pull it from the oven. If you trust the reading at the moment of removal, you might aim for 74°C, only to watch the meat rise past 80°C while it rests. I always tell people to pull the bird five degrees early!
Resting time is just as critical for texture. Cutting straight into a hot roast releases the juices, leaving the breast dry and stringy. Give the bird ten minutes on a warm board. The temperature will even out, and the meat will reabsorb its moisture. For consistent results:
- Anticipate a 5 to 8°C carryover rise in large birds.
- Always rest before carving.
- Measure in the thickest thigh, away from bone.
That resting window lets the temperature stabilise, so your poultry thermometer gives you a true reading of the final product.


0 Comments